
In early April 1982, Argentina invaded the Falkland Islands, a few desolate rocks in the South Atlantic. The British mobilized their fleet in response. After a fierce battle in the air and at sea, the British gained the upper hand, and began landing troops on May 21st at San Carlos Water on the west coast of East Falkland. The Argentinians attempted to defeat the invasion with air attacks, but the British eventually gained the upper hand. On the 28th, the British, despite some setbacks, began the ground campaign, defeating the Argentinian garrison at Goose Green and opening the way to lay siege to the main enemy positions near Stanley. The first days of June saw the islands shrouded in clouds, but that didn't prevent the British from leapfrogging forward to Fitzroy and Bluff Cove, just to the south of Stanley.1
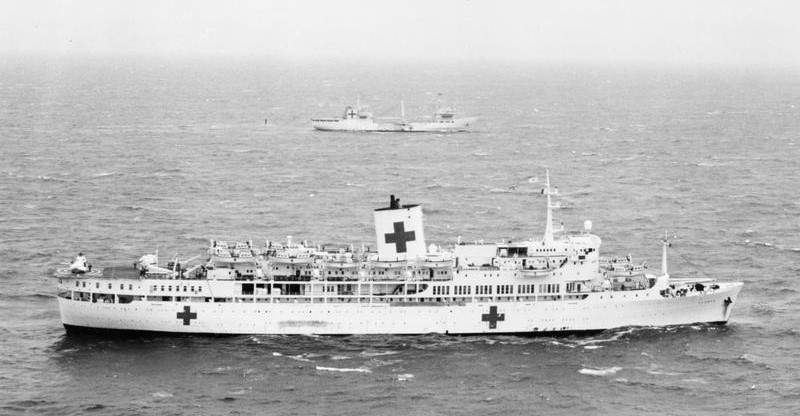
Uganda and Bahia Paraiso transferring casualties
The bad weather persisted on the 4th, keeping the Harriers grounded and slowing helicopter operations. Unloading and reloading continued at Ajax Bay, with Sir Percivale preparing to take another load to Teal Inlet while Sir Tristram took on supplies for Fitzroy. A captured coastal freighter was used to carry two companies of the Gurkhas forward to Bluff Cove, near Fitzroy. Argonaut, damaged on May 21st, was finally repaired enough to make her way home. She departed at noon after transferring all of her excess supplies to other ships. In the "Red Cross Box", Argentine hospital ship Bahia Paraiso arrived to take Argentine wounded from Uganda, and announced her intention to retrieve more wounded from Port Howard and Fox Bay on West Falkland. This caused a scheduled bombardment by Plymouth to be cancelled.
VYCA-2 had noticed that the Harriers were not flying, and passed the word to the mainland, which dispatched the first high-level daylight raid since May 1st. Four Daggers appear to have attempted to bomb Teal Inlet, but hit an area on Berkeley Sound, far from the British, instead. Another quartet of aircraft, probably Canberras, attacked near Mount Kent, although their bombs landed within 500 yards of the British positions. That evening, Exeter attempted to bait one of the land-based Exocets with her Lynx helicopter, fitted with an improvised radar reflector and tasked with simulating a bombarding warship. The Argentinians didn't fall for the trick, and Exeter instead headed for San Carlos to bolster the defenses there. Finally, only an hour before midnight, Invincible managed to find better weather south of the Falklands and launched the first Harrier missions in two days, westward to probe the limits of Argentina's mainland air defenses. They drew no reaction, and the British carrier turned east to be back with the rest of the task force.
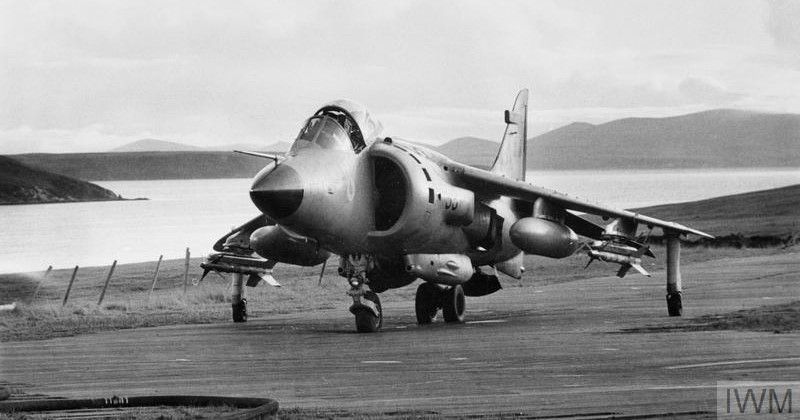
A Sea Harrier at the forward strip at San Carlos
In the early hours of the 5th, another Harrier was launched to investigate a radar contact. The interception was unsuccessful, and the fighter returned to find Invincible shrouded in a thick fog. The radar-controlled approach brought him within 50 yards of the carrier, but he was still unable to see the deck, and a second approach had to be made, with Invincible's crew throwing flares over the stern to guide him in. When it was safely on deck, the Harrier was found to have less than 20 gallons of fuel remaining. The weather began to clear later in the day, and Hermes flew off a Sea Harrier and a pair of RAF GR3s to the airstrip at Port San Carlos. The forward refueling capability greatly increased endurance for the CAP and reduced response time to calls for air support. Elsewhere, the improved weather allowed the helicopters supporting the ground force, now 40 in number, to operate more effectively. By the end of the day, two full artillery batteries were in position to support the attack, and the buildup of supplies had accelerated. At San Carlos, 2nd Battalion Scots Guards loaded aboard Intrepid for the trip to Fitzroy, while the Welsh Guards had to abort their march to Darwin due to issues with the transports carrying their heavy equipment.
That evening was not a pleasant one for the British. Intrepid launched her LCUs about 35 miles from Bluff Cove and then retired, as the British were afraid to bring such a valuable ship in close to the front lines. Unfortunately, the weather turned rough, and it was seven hours before the soaked Scots Guardsmen reached their destination. Along they way, they had a scare when they were detected by Cardiff, on missile trap duty off Stanley, and illuminated by starshells in case they were hostile. This was not Cardiff's only alarm of the evening, either. She had previously detected a helicopter over Argentine-controlled territory and shot it down with a Sea Dart, only to discover later that it was a British Gazelle. All four onboard were killed. An LCU on passage from Teal Inlet back to San Carlos also ran into two separate frigates who were not informed of its movements, although in both cases the crew were able to establish their bona fides rather quickly. The British quickly moved to improve the coordination between elements of their forces, and no further encounters of this type occurred.
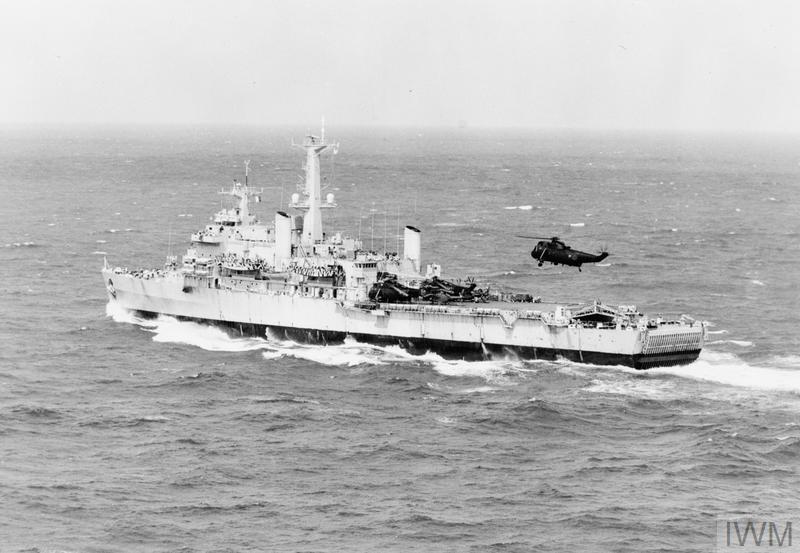
Fearless
The weather closed in again on the 6th, limiting both fixed and rotary-wing operations. The carrier group had a quiet day, replenishing once more from the auxiliary ships. It was the last unrep for RFA Fort Austin, the first ship to pass Ascension going south. The hard-working auxiliary turned her last stores over to sister ship Fort Grange and headed north. Operations continued in San Carlos, with the Welsh Guards going aboard Fearless, who would take them part of the way to Fitzroy and then transfer them to Intrepid's LCUs, as several of her own were still around Teal Inlet. She sailed at dusk, followed by Sir Tristram, loaded with supplies for 5 Infantry Brigade. Unfortunately, the LCUs from Bluff Cove had not sailed, and Fearless dispatched her two remaining landing craft with some of the guardsmen, then returned to San Carlos in daylight.
The 7th saw better weather around the Falklands, with the helicopters flying almost continuously from dawn until nightfall, their crews snatching meals from the ships, who worked hard to provide hot food. Hermes spent the day outside the exclusion zone, her crew performing urgent work on her propulsion plant. One by one, her boilers were shut down and cleaned, work never done at sea in a war zone before. Despite her withdrawal, her aircraft were still able to contribute to the defense of the forces ashore, thanks to the forward base at San Carlos. The Argentine Air Force also attempted to take advantage of the weather, dispatching a pair of Learjets on a high-level photographic mission over San Carlos. Exeter downed one with a Sea Dart, allowing the other to escape and carry home the message that the area was still unhealthy for their aircraft. Departing San Carlos that evening were Norland, headed for Montevideo with Argentine prisoners onboard, and Sir Galahad, carrying supplies and the remaining Welsh Guards to Fitzroy. Alacrity was the first undamaged warship sent home, as she had fired so many 4.5" rounds that her gun was worn out. Her captain "Propose[d] to go on until it drops off", but he was overruled. The night was largely a repeat of the previous few days, with the LPDs picking up their scattered landing craft, and various warships shuffling around and bombarding Argentine targets. Cardiff, assigned to the missile trap off Stanley, attempted to shoot down a plane approaching the airfield, but the missiles malfunctioned and the aircraft got away.
The next morning saw Cardiff and the frigate Yarmouth duel with the 155mm guns the Argentinians had set up for coastal defense. Far out to sea, the civilian tanker Hercules, going about its business unrelated to the war, was attacked by an Argentine C-130, and finished its journey to Rio with two unexploded bombs onboard, the only case where a neutral was attacked by either side. In the early afternoon, the frigate Plymouth was sent into Falkland Sound to bombard a suspected observation post. The strip ashore was in heavy use until 1050, when one of the GR3s lost power on takeoff and crashed, putting the runway out of service for three hours. This meant a dramatic reduction in time on station for the CAP operating off of Hermes, still cleaning her boilers far to the east.
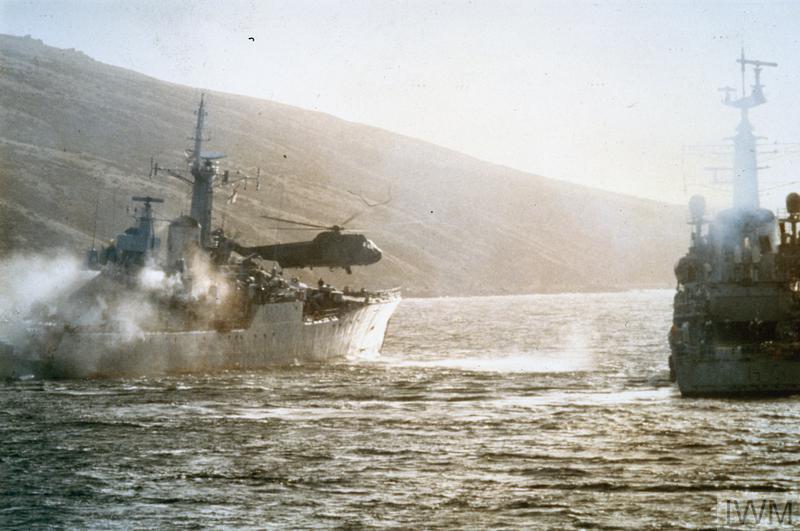
Plymouth on fire in San Carlos
This was to be disastrous, as the Argentinian Air Force made its first strikes in over a week, aimed at the ships around Fitzroy and Bluff Cove. Six Daggers and eight Skyhawks were launched, although one of the former and three of the latter had to drop out due to technical problems. The Daggers got lost as they approached the Falklands, ended up over Falkland Sound instead of Fitzroy, but they were lucky enough to spot Plymouth and all five bored in to attack her at 1300, strafing and dropping bombs. As usual, the bombs failed to go off, one piercing the frigate's stack and two more hitting near the Limbo anti-submarine mortar. The last struck the depth charges stored for the helicopter, setting one off. Astonishingly, none of the crew were killed, and only two were seriously injured. Plymouth's efforts to shoot down her attackers were unsuccessful, but her crew had the fires under control within 10 minutes, and out half an hour after that.

Damage to Plymouth's stack
The Skyhawk's navigation was significantly better, but they nearly missed their target as well, the LSL's Sir Tristram and Sir Galahad being deeper in the coves than expected and not visible from low offshore. As they turned for home, one of the jets got high enough to see their masts, and the Skyhawks turned to attack, the leader splitting his efforts between the two LSLs. The unloading of the vessels, particularly Sir Galahad, had been delayed by a lack of landing craft, and the Welsh Guards were still aboard at 1315, when the Skyhawks suddenly appeared, too close for the British to do anything but take cover. Three bombs struck Sir Galahad, while Sir Tristram was hit twice, although she was lucky and the bombs didn't go off. A third one, landing close to her stern, did, and the blast tore off her stern ramp. Both ships immediately caught fire, and Sir Galahad was ordered abandoned. Casualties were heavy, particularly among the Guardsmen onboard, but five helicopters were on hand, and they, working with the various small craft in the area, were able to evacuate all healthy survivors within 35 minutes. It took another half-hour to remove the badly wounded from the wrecked and burning ship.
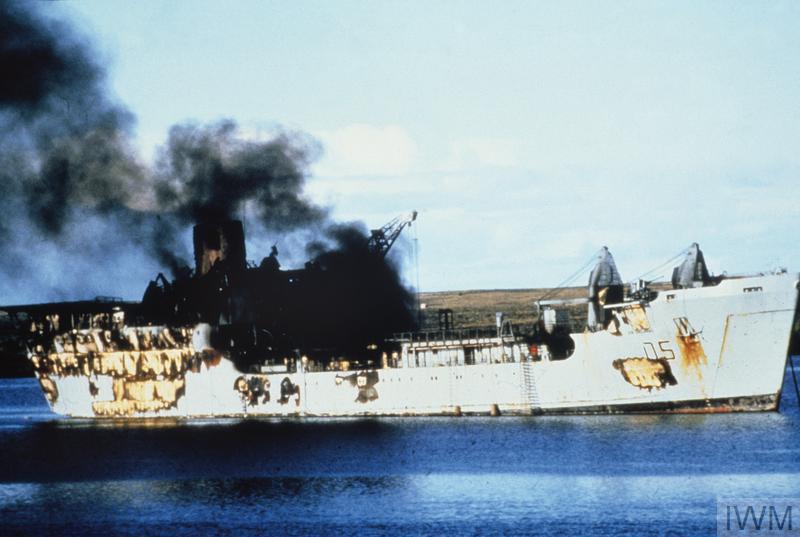
Sir Galahad burns
Sir Tristram's crew fought her fires valiantly, but eventually had to abandon her as well. Fortunately, the fire was confined to the crew accommodations, leaving both the engines and the remaining cargo of ammunition intact. Fifty men were killed, all but two aboard Sir Galahad, and 57 wounded, mostly with severe burns. If it were not for the helicopters, whose crews repeatedly hovered over the flaming ships to pick up wounded, the toll would have been much higher. A BBC TV crew was in the area, and their footage of the rescue operations made a lasting impression on many watching at home.
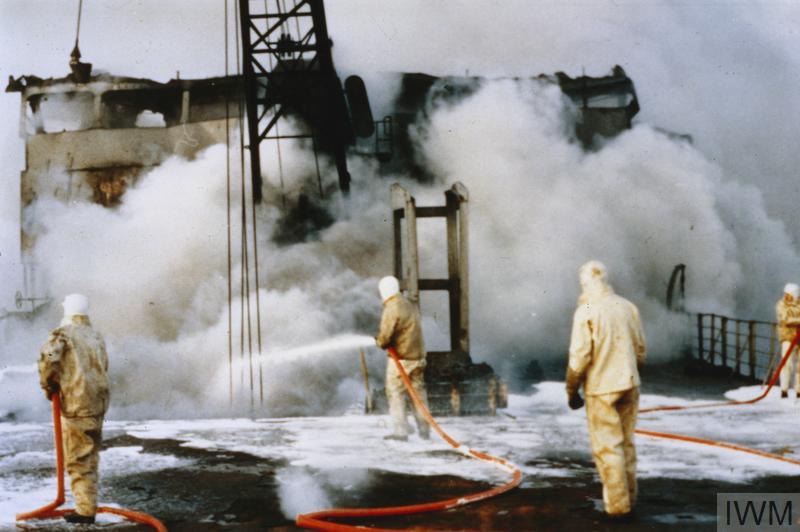
A Damage Control crew on Sir Galahad battles the flames
Nor was that the end of the airstrikes on the 8th. A decoy flight of Mirages and some Navy Skyhawks both passed unnoticed, but the next flights did not. A quartet of Air Force Skyhawks raided troop positions near Fitzroy, doing little damage and suffering two planes shot up, while another quartet went looking for ships on the southern coast of East Falkland. The Harrier CAP was sent after a decoy flight of Mirages, leaving the Skyhawks unmolested. They spotted an LCU en route from Darwin to Fitzroy with vehicles onboard, and attacked, hitting it with a bomb and killing 5 members of its crew, even though the bomb probably didn't go off. Unfortunately, another pair of Harriers on a training mission were overhead at the time, and quickly dived on them, shooting down three of the four Argentine jets with Sidewinders. The LCU remained afloat for several hours before slipping beneath the waves, the survivors rescued by a Sea King.
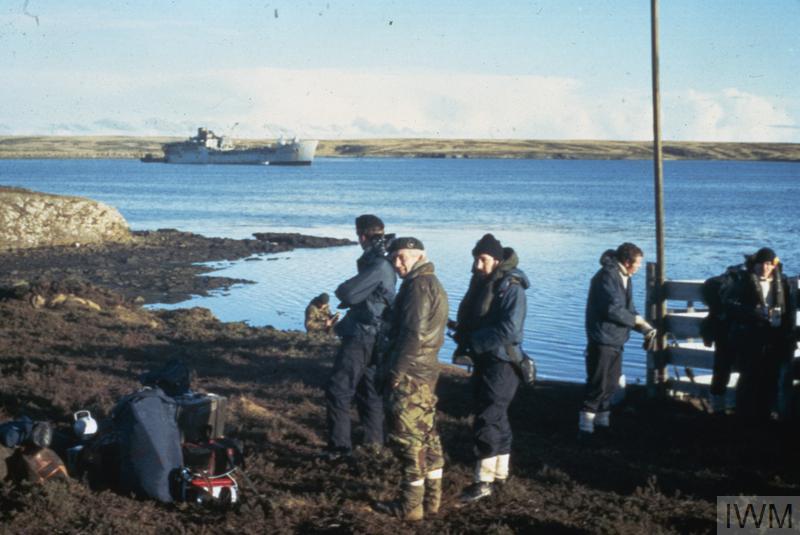
Some of Sir Tristram's crew prepares to go back aboard a few days after the attack
The attacks on Plymouth and Fitzroy were major setbacks for the British, although neither materially impacted their fighting capability. The biggest issue was the loss of two LSLs. Sir Galahad would eventually be towed out to sea and sunk, while Sir Tristram was carried home by a heavy-lift ship after the end of the war and rebuilt. The three remaining LSLs would have to shoulder much of the burden of moving supplies and equipment forward, although the combat power of the British ashore was largely undiminished. Plymouth would be back in action within a few days, and the Argentinians had ultimately only bought themselves a little time before the inevitable ground assault. Our story will continue there next time.
1 For more information on ships and aircraft, as well as links to the whole series, see my Falklands Glossary. ⇑
Comments
When it was safely on deck, the Harrier was found to have less than 20 gallons of fuel remaining.
So, how many minutes of flight was that?
The book I got it out of doesn't say, and that's always a complicated question because it depends heavily on what sort of flight regime you're in, but I'd guess that they didn't have enough fuel for a second pass.
Out of curiosity I posted that question on our pilot's forum. Now granted there are 1001 "it depends" caveats that factor into this, but one former Marine said that he had a rule of thumb of planning on 1 gallon (7.something pounds) for 2 seconds in this phase of flight and landing.
Sounds as if this pilot had no more than 30 or forty seconds of powered flight left. I will see if there are any more responses.
He did relate that one of his squadron mates flamed out just after touching down at Cherry Point one morning so it happens.
Sea Harrier has an empty weight of 14,052 lbs, and the Pegasus turbofan has a specific fuel consumption of 0.76, which give 10,680 lbs/hour fuel consumption hovering when empty. That's 0.46 gallons per second, plus a bit for the weight of the pilot, etc.
One gallon per two seconds, close enough.
While it doesn't apply in this circumstance (because the plane was so short of fuel), the usual limiting factor on a Harrier's hover is not fuel, but water. When hovering, the engine doesn't have enough airflow to cool its turbine blades, so distilled water must be injected in order to prevent the blades from overheating. A Harrier normally carries enough water for 90 seconds of hover, so even if the plane had ample fuel, it still wouldn't be have been able to hover indefinitely while the landing pad came into view.
PS: Every time I read about the engineering of the Harrier, I'm surprised that it gets off the ground at all, much less is actually usable as a combat aircraft.
A couple good replies from my colleagues who have granted me the ok to post their responses.
"The low fuel lights come on steady at 750#/side +/-100 and the flashers come on at 250#/side +/-50. Fuel flow in the hover is about 200-300 pph. That was for the F402-RR-408. It's been too long since I flew a -406.
The single seats carry 7700# without drop tanks (though the gauge normally reads 75-7600). That equates to about 1.5 on an admin instrument leg and on deck with about a .8 to 1.2. In either BFM or LAT that'll only equate to about a .7. Two drops makes a total of about 9.5 and about a 2.5 hour admin leg or 1.5 to 1.7 tactical sortie.
Most set states at the boat are between 1.0 and 2.5 depending on a lot of factors, but the general rule is to be on deck with .8 and definitely by .5. It was pretty routine to do a functional check flight and land with about a .8, then "press up" into a hover until the flashers came on, then land around .3 or so. Most other times ashore people would be in the overhead with about a 1.4 and on deck with .8.
My afloat "record" was on the deck with .1. Not what I was looking for, obviously. 12 Mar 2003.
We carried 500# of demineralized water that was injected into the turbine section at set JPT/RPMs. That was general about 90 seconds and was plenty. On a heavy combat sortie (about 31K takeoff), we would generally use about 100-200 # on the takeoff (shipboard) and leave the rest for landing. The lighter we are when we land (no bombs remaining, for instance), the easier it is to land and the lower the JPT will be in the hover. That will limit the amount of water burned during landing.
Generally speaking, 90 seconds was plenty and only came into effect when doing CQ/FCLP (carrier landings and practice) or when recovering with ordnance aboard.
Just to be clear, though...that's for a AV-8B with a "big engine" -408 motor. The Falklands was fought with Harriers that were about 3 generations older than that, namely FA-2s and GR-3's (I believe....been awhile).
Suffice to say that comparing the GR-3 to a AV-8B II+ (Night Attack and Radar variants) is like comparing a 737-200 to a MAX-10.
They may look the same, but they're VERY different aircraft.
Note: All open source. Just appreciate the first hand perspective.
...and from the other guy. He is referring to the question about the 20 gallons on the deck for that Sea Harrier.
Post Mon Apr 27, 2020 8:23 pm
I flew the AV-8B, and the systems were very similar, but the B model was lighter and had a stronger motor. I'm guessing he got what we call "Flashers". The low fuel light comes on steady at 500lbs remaining, and when it gets REALLY low (150lbs) the light flashes. This usually only happens when you are already in the hover, so it really means pull power and land NOW before you flameout. The low fuel light is the most accurate indication of actual fuel remaining (as opposed to the fuel quantity indicator). Especially in the earlier models (USMC AV-8A and the UK Sea Harrier) the engine wasn't strong enough to hover with much in terms of fuel remaining, much less external ordinance. Coming back to the boat with low fuel was required, but getting flashers at the end of a mission was not the norm. However, it was not uncommon to recover at the boat with less than 1000 lbs. The internal fuel capacity was 7500, so the range was limited unless you used external (drop) tanks or hit the tanker - and often we did both. When hovering, the fuel burn is about 100 -110 lbs per minute and for a bingo profile we used 50 lbs per minute. So we had to compute the fuel ladder to arrive at the initial for the break at 1200 lbs, and usually landed with just under 1000lbs. During training, we would arrive with more so we could work the pattern for multiple passes before getting gas. my last flight in a Harrier was in 1999, so my numbers (and memory) may be off a bit - my apologies for unintended errors.
Neal, thanks for that. It's neat to get some first-hand perspective on this.
As for the details, the Falklands Harriers were GR3s and FRS1. The FA2 was the second-generation Sea Harrier, which should have been the FRS2, but the British got Americanitus.
@quanticle
Well said. The Harrier is an incredible piece of engineering, but in the way that it's incredible that it works.
@quanticle
From a couple of comments on the Harrier question the pilots who have flown it seem to share your awe at how it actually works. I guess after having gotten a brick to fly (the F-4) the engineers were looking for another challenge in what they could get airborne...on of those do all the design and calculations sorts of things "and then a miracle happens" to get it to fly.
Thanks for making all that clear, guys.