
In May of 1916, the stalemate in the North Sea between the British Grand Fleet under John Jellicoe, and the German High Seas Fleet under Reinhard Scheer came to an end. The British used German signals to learn of the fleet's sailing and sent Jellicoe out to trap him. The British battlecruisers under David Beatty first met Hipper's German battlecruisers, and chased them south until they met the main body of the High Seas Fleet, losing two of their number to magazine explosions in the process.
Jutland: The Run to the North
As the British turned north, the battle began to shift. The weather was getting worse, as it often does in the North Sea. Beatty finally signaled Jellicoe ‘Fleet action is imminent’, although he did not give details, and took five more hits from Hipper without hitting back before his ships pulled out of range. The German battle fleet divided its fire between the escaping HMS Southampton and the 5th BS, who also suffered under Hipper’s fire. Malaya, in the rear of the line, was particularly badly hit, taking a total of 7 shells from the German battleships. None were fatal, although a large cordite fire put the starboard 6” battery out of action, killed over 100 men, and came close to setting off the 6" magazines. Barham took four shells from Derfflinger and Warspite two from Seydlitz. The battle wasn't entirely one-sided, as Seydlitz was hit by a destroyer torpedo during the British turn north.
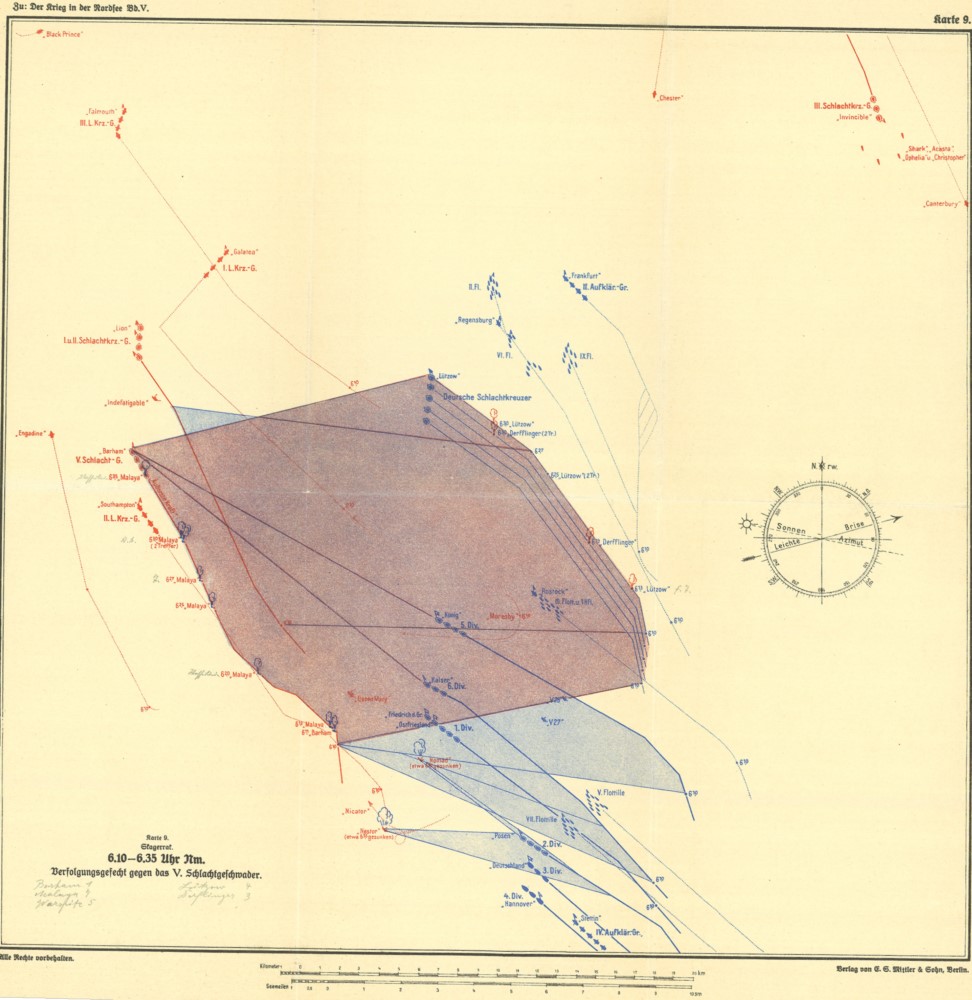
Evan-Thomas was not idle, though. Barham and Valiant targeted the battlecruisers, while Warspite and Malaya fired back at the approaching battleships. Despite being outnumbered 4 to 9, they held their own. In exchange for the 13 hits they took, they managed to land an equal number on the German battlecruisers and 5 on the battleships. Only one of these did serious damage, to Markgraf.
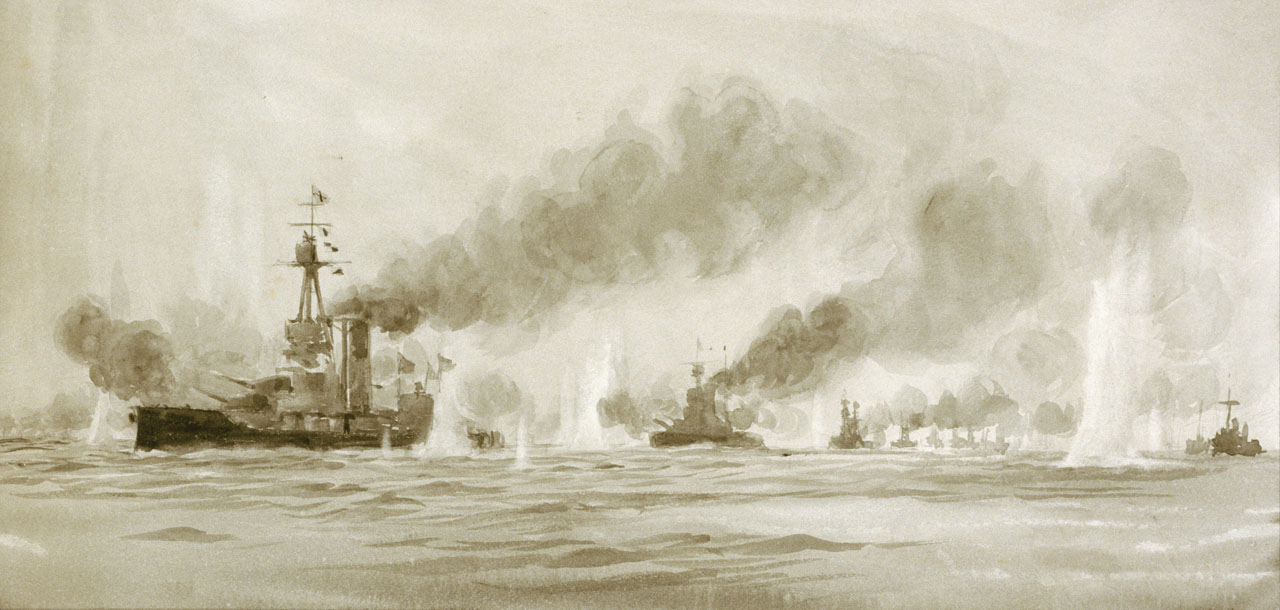
The British forces, including the 5th BS, engaging early in the battle1
There is some controversy over what happened next. Beatty claimed that Evan-Thomas took up station on his disengaged side, although German accounts and several notable historians disagree.2 As the 5th BS outran the High Seas Fleet, Beatty began to turn northeast, threatening to cross Hipper’s T.3 Hipper was forced to turn east in response, which put Beatty between him and the approaching Grand Fleet.
At around 1845, the battle resumed, with Beatty’s gunners finally gaining the advantage. Seven hits were scored in nine minutes, on both Hipper’s and Scheer’s ships. At this point, Beatty was getting close to the Grand Fleet, although Beatty had still not told Jellicoe where the Germans were, and in fact had briefly lost sight of them. In fairness, Lion’s radio had been destroyed early in the action, although several other battlecruisers still had operational sets. Jellicoe’s job was made even more difficult by the fact that all ships had to resort to dead reckoning, and most of the reports were off by several miles. Nor had Beatty’s subordinates sent back reports. In partial defense, the radios of the day were very primitive, and the sets in use at the time only left a very limited number of channels, which meant strict discipline in when to use the radio. Military technologies are rarely used correctly at first, and modern doctrine emphasizes the importance of reporting, even when you’re pretty sure someone else already has.
Jutland: The deployment
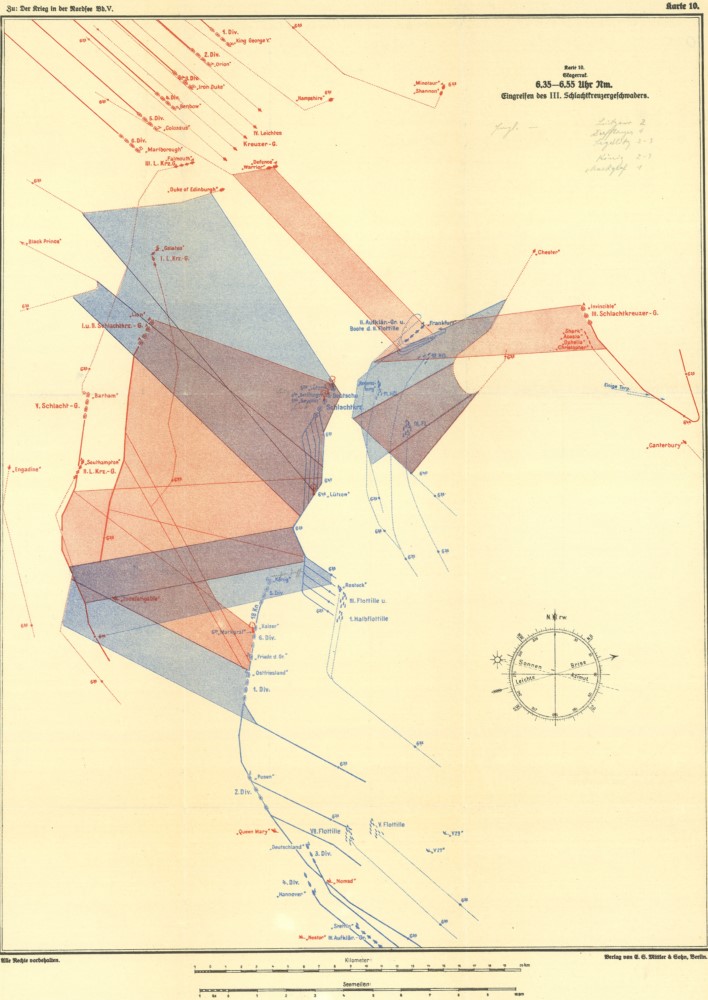
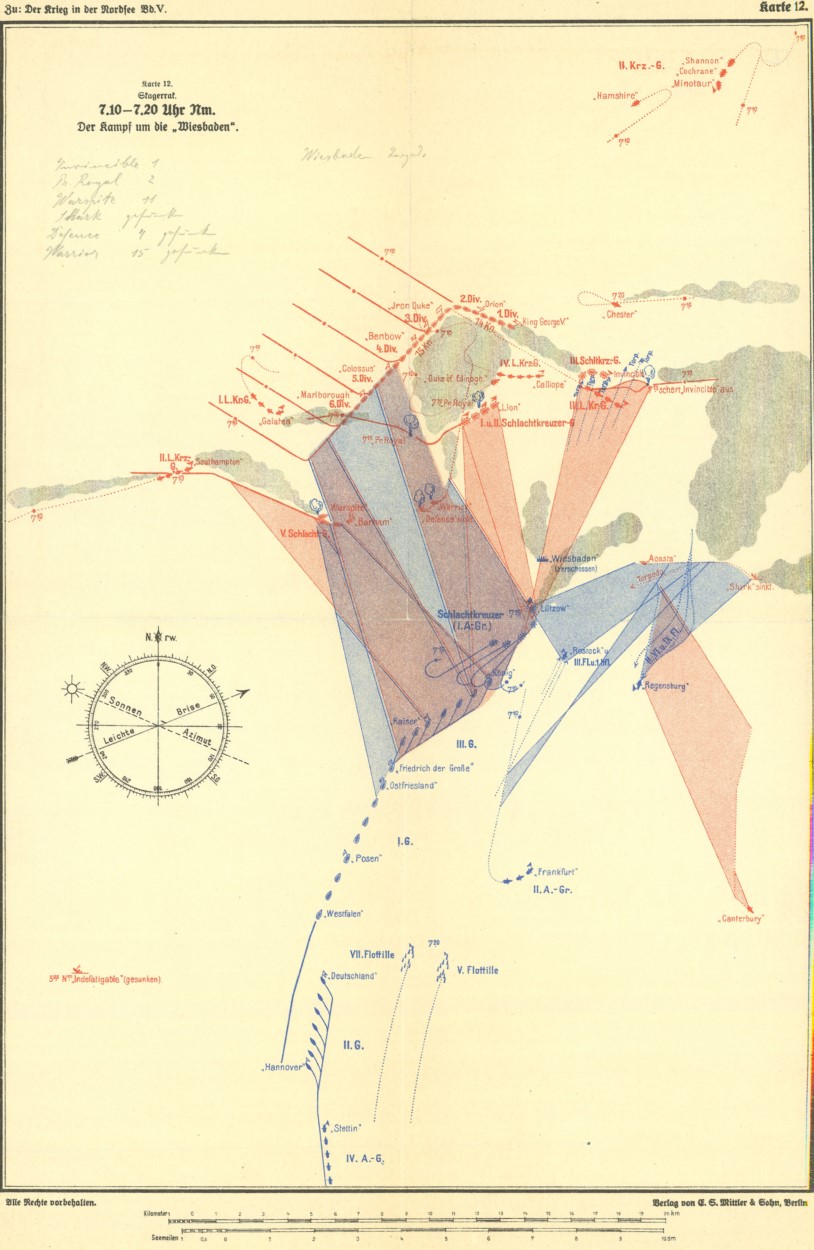
At 1838, the cruiser HMS Chester first sighted the lead elements of Hipper’s screen. She was part of the screen for Rear Admiral Horace Hood’s 3rd Battle Cruiser Squadron, and was outnumbered by the German scouting group until Hood’s 3 battlecruisers came to her rescue. At 1856, Hood's flagship Invincible disabled the light cruiser Wiesbaden. Hood was off to the east of the main body of the Grand Fleet, while Beatty was coming up from the west. At 1900, Lion was finally sighted from Iron Duke, Jellicoe’s flagship. Beatty had at this point lost sight of Scheer, and Hipper’s ships were driven to turn south by a torpedo attack by the cruisers and destroyers of the Grand Fleet.
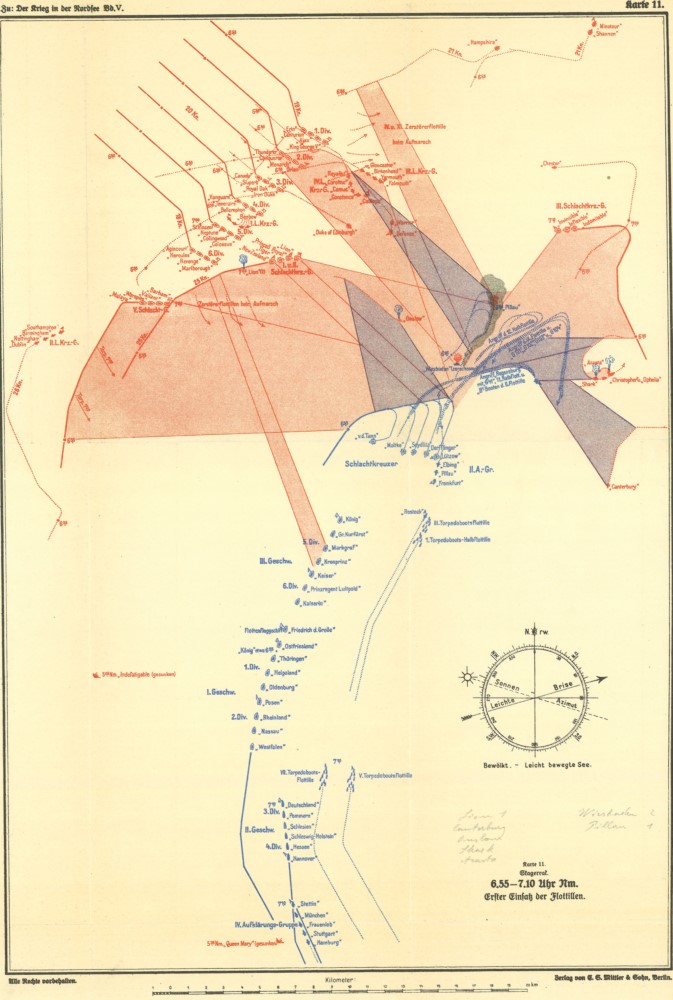
At about this time, another action was occurring. The armored cruisers Defence and Warrior were attached to Jellicoe, but had been led south, cutting so close in front of Beatty that Warrior almost collided with Lion, and two other ships of the squadron were trapped north of the battlecruisers. The pair to the south closed on Wiesbaden, but at 1915 found themselves at short range from Derfflinger and four German battleships. Defence was hit by at least three shells, and exploded at 1920, taking all 903 men aboard down with her. Her death was visible from the ships of the Grand Fleet, not a sight likely to increase morale.
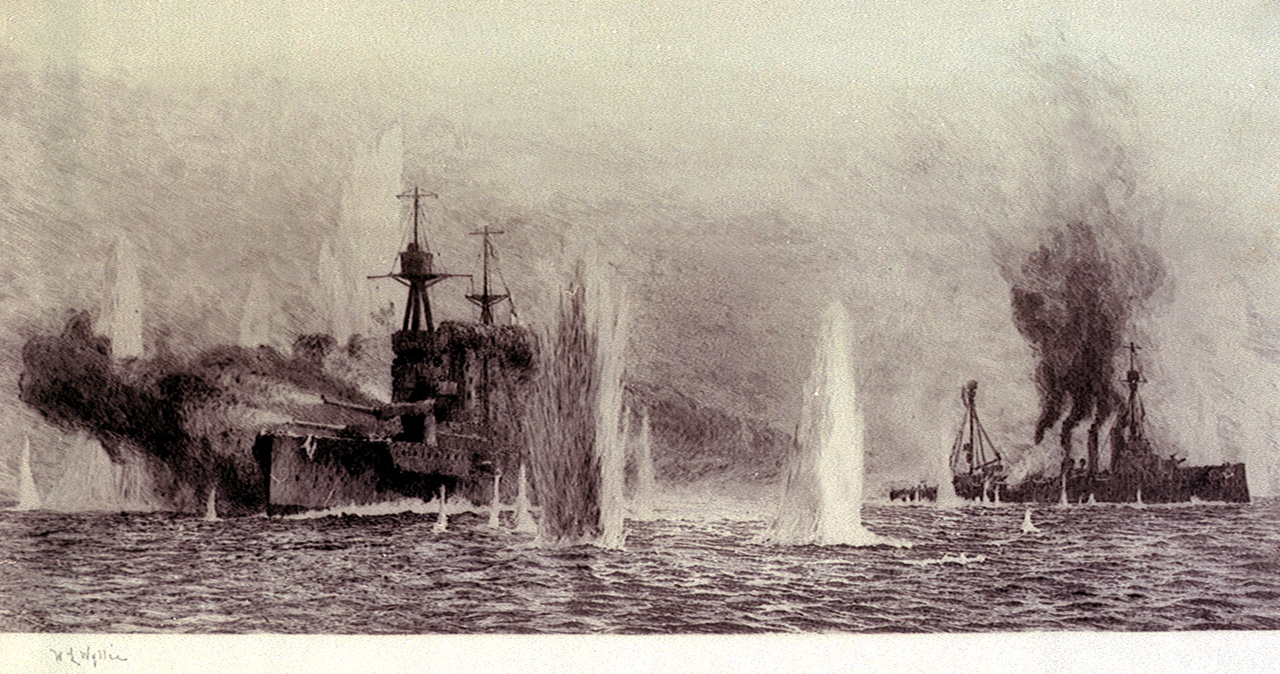
Warspite and Warrior under fire4
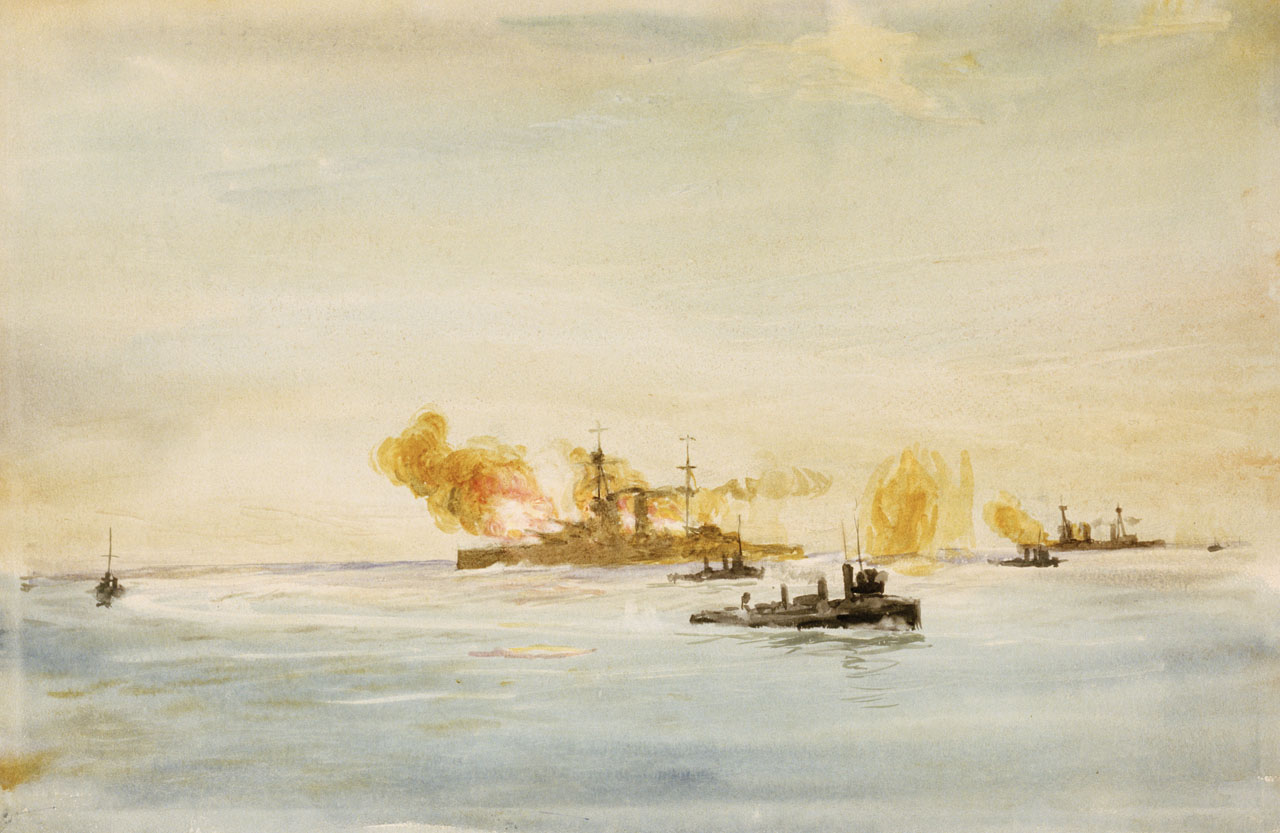
Warrior was spared the same fate by a mishap that befell Warspite as the 5th Battle Squadron raced to catch up with the end of Jellicoe’s line. Warspite's steering gear jammed, leaving her steaming in circles in full view of the High Seas Fleet, attracting shells away from the armored cruiser. Warrior, badly damaged, survived until the next morning. Warspite took 13 hits, but survived to have an illustrious career in WWII. She was detached and sent home, while the other three ships of the 5th BS joined the end of Jellicoe’s line.
While all of this was going on, Jellicoe was wrestling with the decision to deploy. The Grand fleet was steaming southeast in six columns of four ships each. On Jellicoe’s orders, the leading ship in each column would turn either port or starboard, with the rest of the ships in its division following it into the turn, to eventually form a unified battle line going either east or west. Unfortunately, he didn’t know if the High Seas Fleet was directly ahead or off to starboard (west). In the former case, a deployment to the east would silhouette the Germans against the dusk sky while hiding the British, possibly cross Scheer’s T, and put the Grand Fleet into a better position to cut them off from their base, while going west would bring him closer to Scheer, but probably put them broadside-to-broadside. Either deployment would take 15 minutes, and Jellicoe could not afford to be caught in the middle of the deployment, as ships would turn on the same spot, giving the Germans easy targets. At 1915, Jellicoe finally ordered deployment to port (east), one of the most vital decisions of the war. It turned out to be the right one, although fate and quick action on Scheer’s part meant it was less decisive than it should have been.
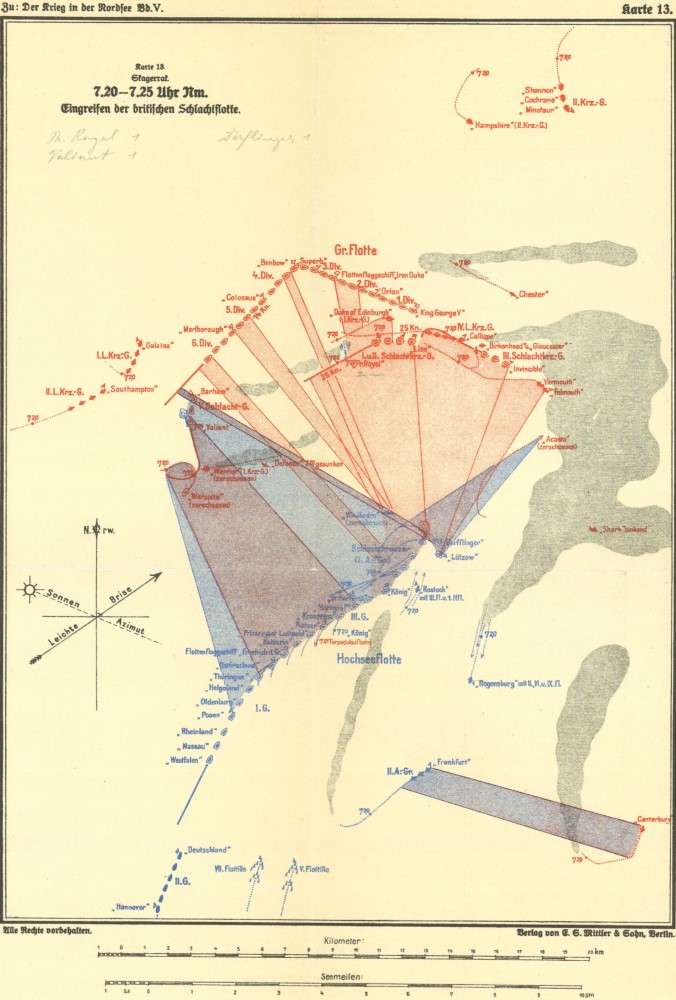
The maneuver itself was carried out successfully, despite the difficulties inherent in maneuvering 24 dreadnoughts and 120 screening ships in close proximity while German shells fell around them.5 It wasn’t entirely smooth, and some ships even had to back to avoid collisions,6 but it was a magnificent example of shiphandling. The leading ship, King George V, did not head at 90 degrees to the previous course, but instead turned more to the south, to cross Scheer’s T. The result was a concave arc of British battleships, straightening out cleanly across Scheer’s course. Oddly, it was the ships of the rear division, Marlborough and Revenge, that opened fire first, at 1917. Six minutes later, Iron Duke joined them, although she initially fired as Wiesbaden, as did many other British ships. At 1930, she shifted her fire to the battleship Konig, and turned in one of the best gunnery performances of the battle, hitting Konig seven times out of 43 shells fired in the next five minutes.7

To the east, the battlecruisers were fighting again. Hood’s 3rd BCS was engaging Hipper, while Jellicoe came up from the rear. Hood’s gunnery put Beatty’s earlier to shame. Invincible alone pumped 8 shots in 8 minutes into Lutzow, including two that caused extensive flooding in the bow and ultimately doomed her. However, at 1931, Lutzow and Derfflinger took their revenge, and Invincible, despite her name, followed Indefatigable and Queen Mary to the bottom of the North Sea after a hit on Q turret, taking all but six of her crew of 1,032 with her.8 The bottom where she sank was so shallow that her bow and stern, standing upright, protruded above the surface for some time.
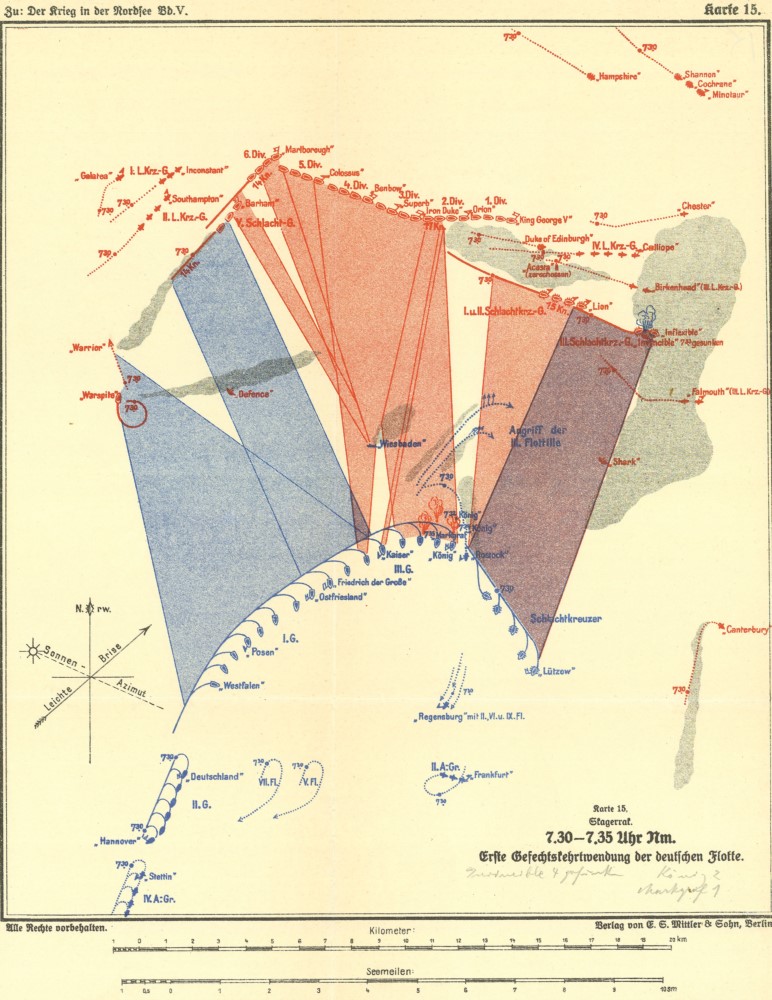
Scheer reacted quickly to the appearance of the Grand Fleet, ordering his famous Gefechtskehrtwendung, “battle about turn” at 1934. Instead of ships turning one after the other, the entire fleet pivoted at once, reversing course and the order of the line. Within four minutes, the entire High Seas Fleet was headed southwest, hidden from the British by the mist. It was an extremely risky and carefully-practiced maneuver, and it worked brilliantly, leaving Jellicoe’s forces facing the empty sea.
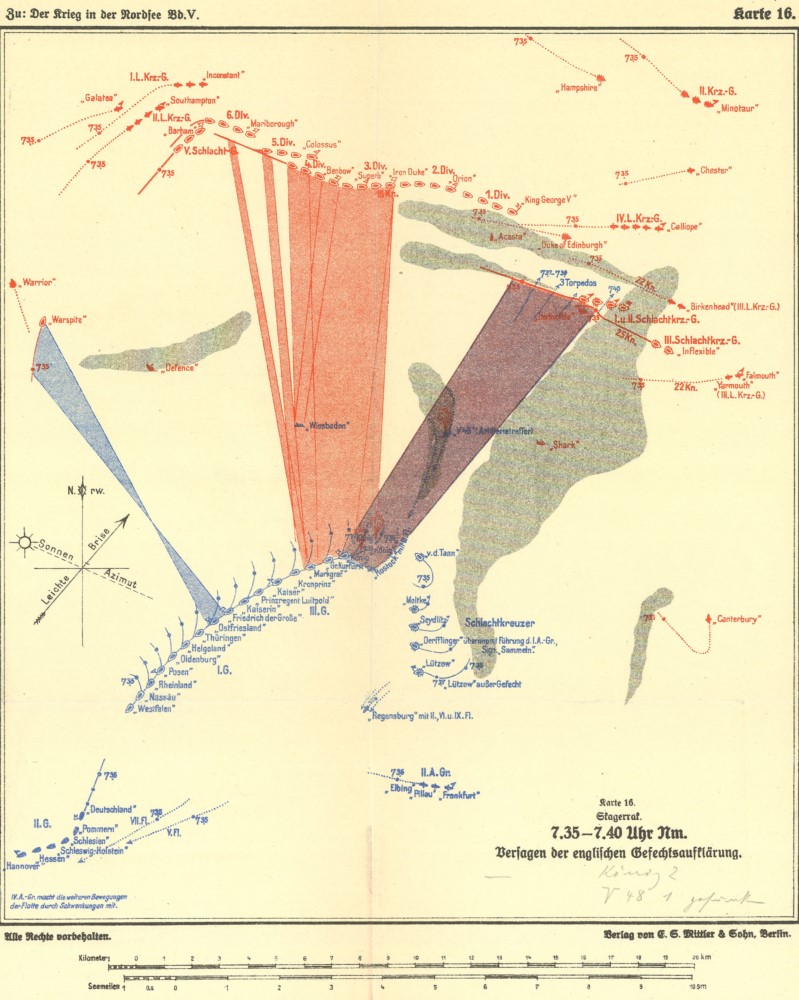
But even with this maneuver, the battle wasn't over. Scheer would return, and the fleets clash once more.
1 Painting from the Royal Museums Greenwich Collection ⇑
2 This is a common occurrence in accounts of Jutland. ⇑
3 Crossing the T is a naval tactic where you put your ship across the enemy's course. This means you can fire your entire broadside, while he can only shoot with his forward guns. ⇑
4 From the Royal Museums Greenwich Collection ⇑
5 These were mostly overs from shooting at the battlecruisers. ⇑
6 "Back" is naval speak for running the engines in reverse. It doesn't necessarily mean that the ship is going backwards, just that they're trying to slow down much more quickly than usual. It's definitely not a normal part of fleet maneuvers. ⇑
7 Unfortunately, the British shells didn't work very well when they hit, so even a magnificent gunnery performance like this didn't sink Konig. ⇑
8 Oddly, one of the survivors had been in Q turret, and was somehow blown clear. ⇑
Comments
It sounds as if Beatty's battlecruisers were shooting poorly relative to just about everyone else ... any idea why?
I discussed some of this in Part 2, specifically the visibility challenges they had at this point. But the British battlecruisers in general didn't have a great record when we look at other battles. One common candidate was that Beatty's ships were based at Rosyth, which didn't have a good place to do practice firing. In fact, that's why Beatty had the 5th BS instead of the 3rd BCS. The battlecruisers had been detached to Scapa to do gunnery training, and the 5th BS had been set to Beatty instead. I don't know exactly how all the factors played in. I have a book on the subject, but haven't gotten around to reading it yet, so there are probably other factors.
Typo in several places: "Weisbaden" should be "Wiesbaden"